一、前言
研究了好久,终于完成了hoppscotch本地一键部署,并支持https。hoppscotch的介绍这里就不做过多描述,网络上非常多,这里先放几张使用效果
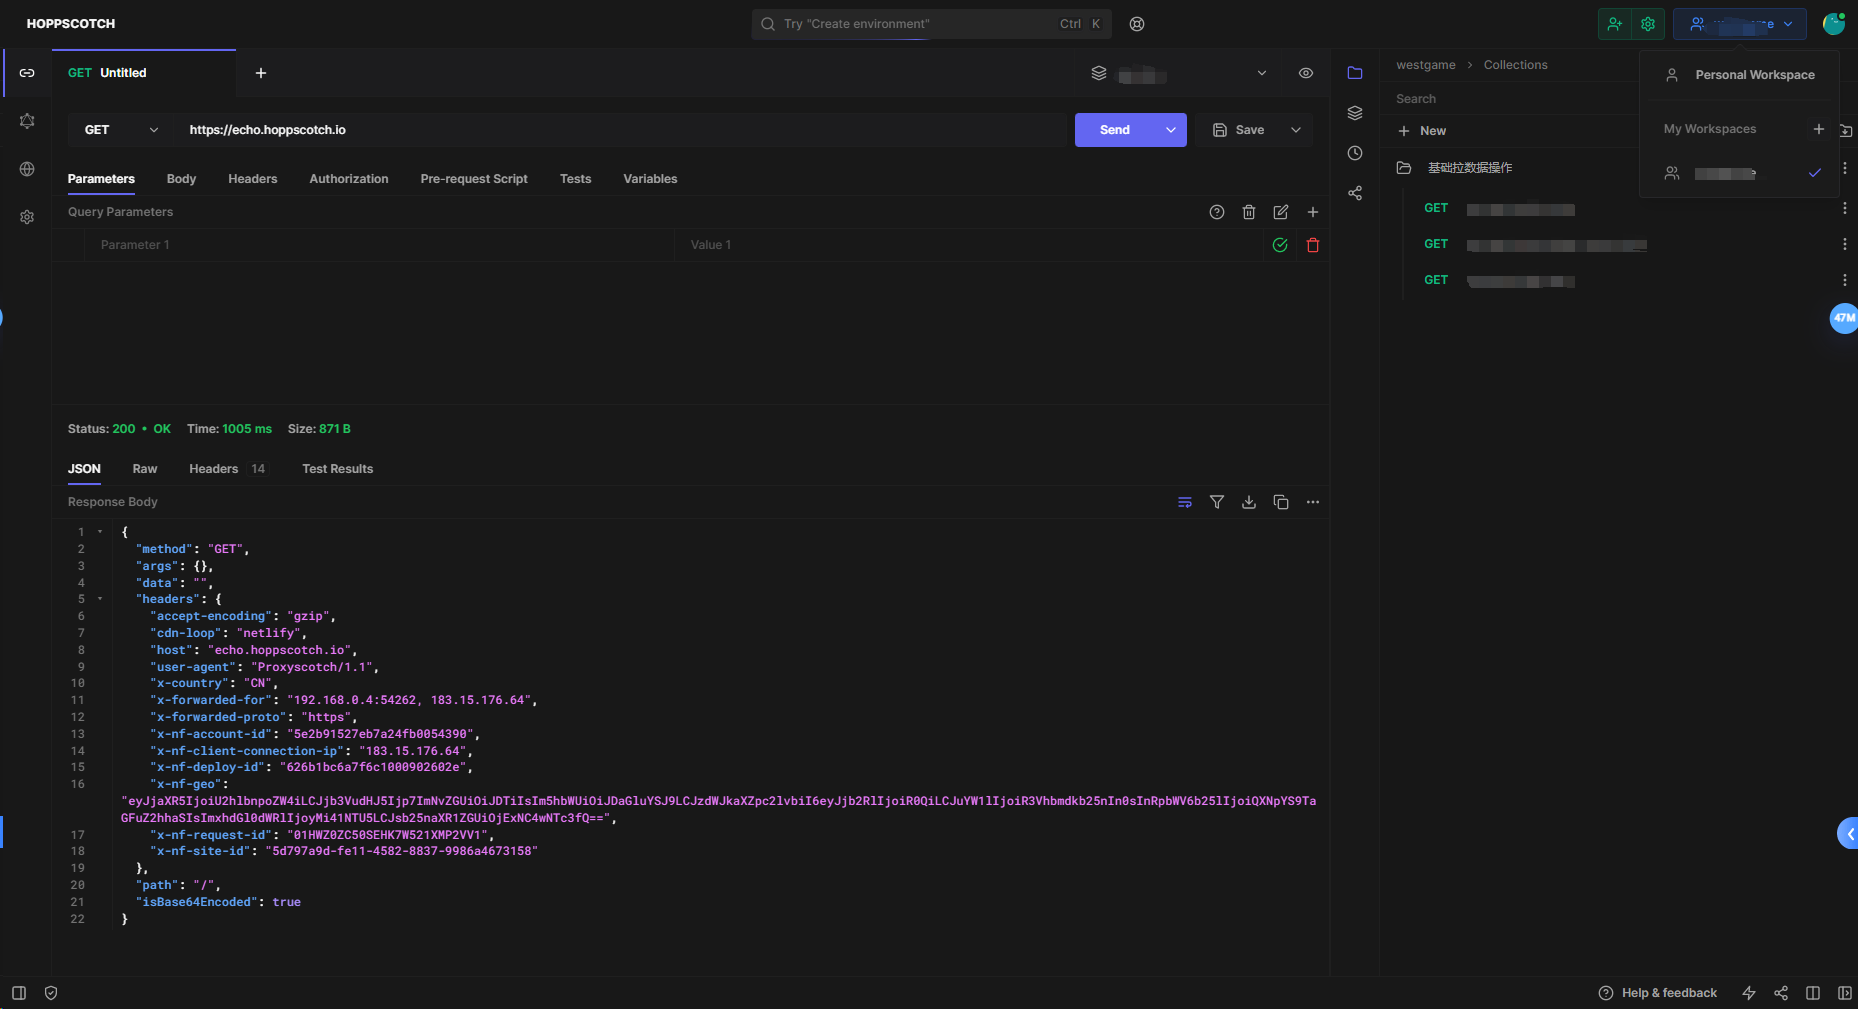
1、api界面
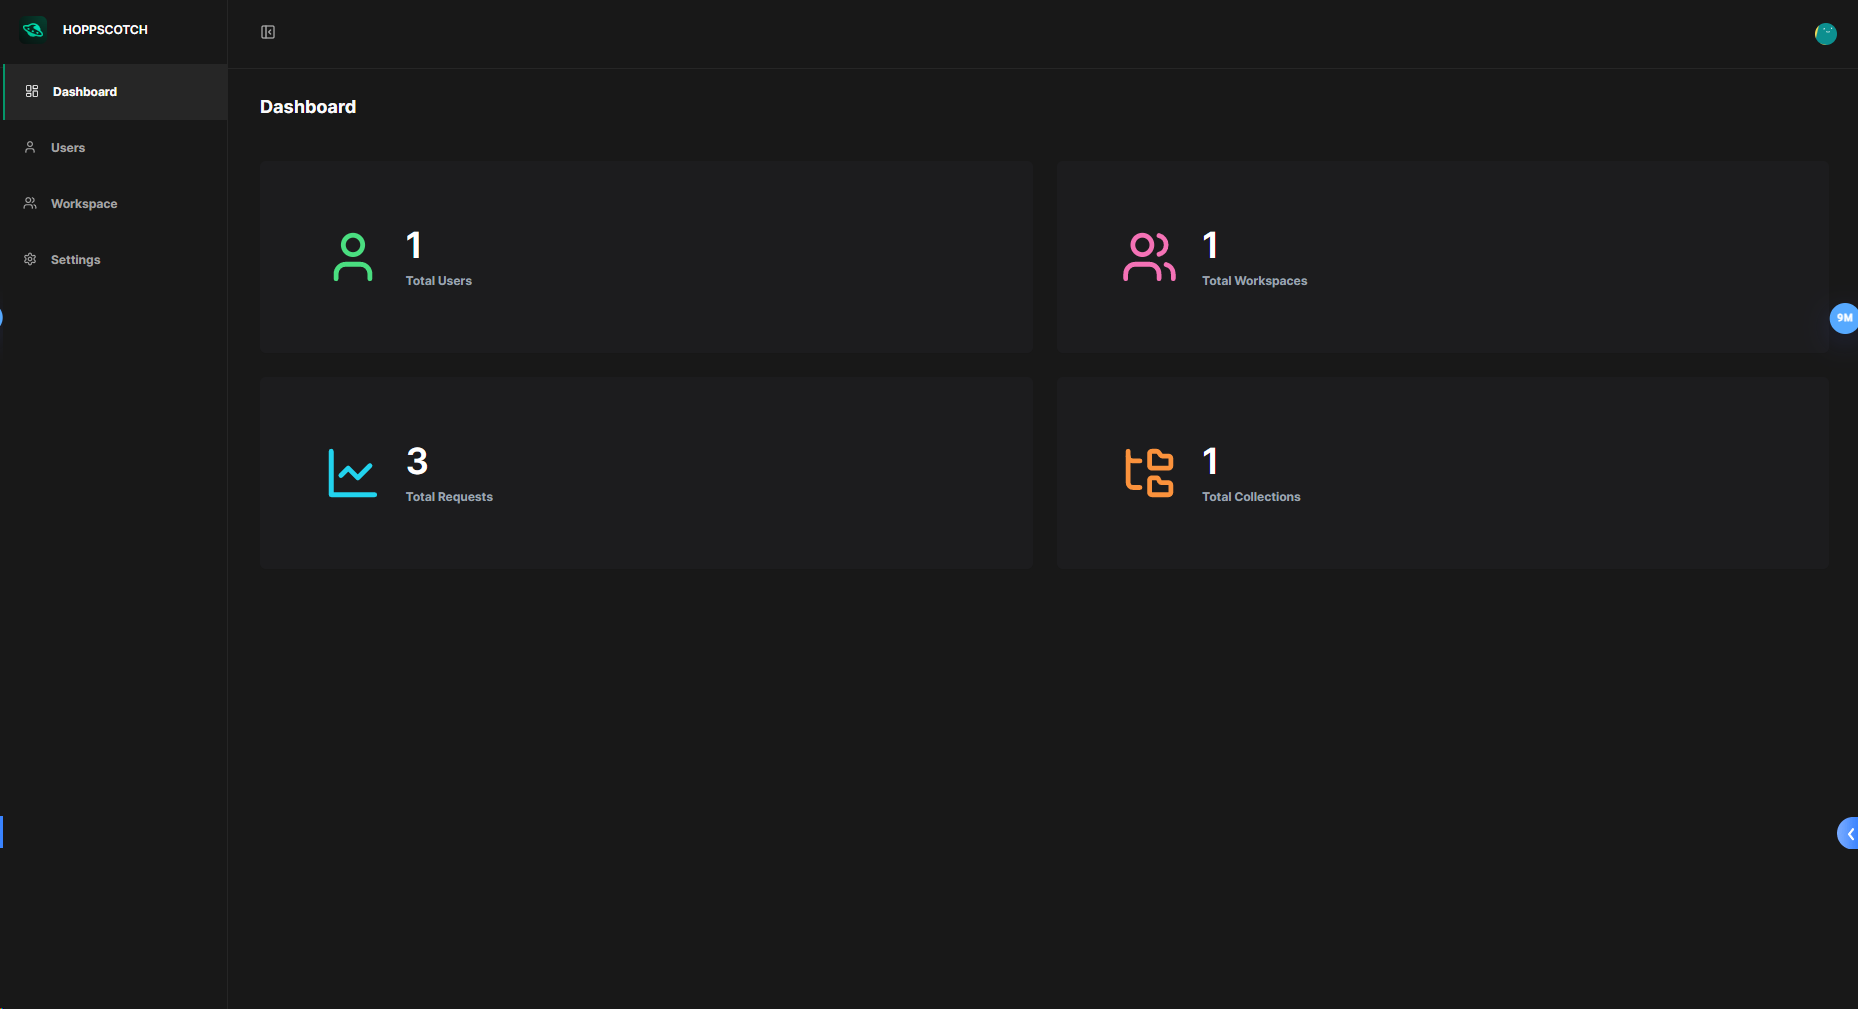
2、管理界面
2、部署效果:
a.使用脚本,./create_and_start.sh(后面会提供),需要传入本机ip(能访问到的),可用的smtp url(建议使用qq邮箱,免费),邮箱名(用于邮件登录时,发送邮件用的发件者,和smtp url对应上)
b.docker会自动部署 postgres(数据库),hoppscotch(此api工具),nginx(代理,支持https需要)
二、一键部署相关配置
1、hoppscotch配置,hoppscotch.env
a.准备好配置文件如下,以下为拿官方配置改造出来的
b.本文提供的方式只支持邮箱登录,如果要其它方式,可自行修改hoppscotch.env。具体可参考官方文档。如只需要邮箱登录,可直接使用本文提供的此配置。
 1 #-----------------------Backend Config------------------------------#
 2 # Prisma Config
 3 DATABASE_URL=postgresql://hoppscotch:hoppscotch@postgres:5432/hoppscotch
 4
 5 # Auth Tokens Config
 6 JWT_SECRET=secret1233
 7 TOKEN_SALT_COMPLEXITY=30
 8 MAGIC_LINK_TOKEN_VALIDITY=30
 9 REFRESH_TOKEN_VALIDITY=604800000
10 ACCESS_TOKEN_VALIDITY=604800000
11 # SESSION_SECRET='add some secret here'
12 SESSION_SECRET=some_secret
13
14 # Hoppscotch App Domain Config
15 REDIRECT_URL=https://__SELF_HOST_IP__
16 WHITELISTED_ORIGINS=https://__SELF_HOST_IP__,https://__SELF_HOST_IP__/admin,https://__SELF_HOST_IP__/backend
17 VITE_ALLOWED_AUTH_PROVIDERS=EMAIL
18
19 # Google Auth Config
20 GOOGLE_CLIENT_ID=""
21 GOOGLE_CLIENT_SECRET=""
22 GOOGLE_CALLBACK_URL=""
23 GOOGLE_SCOPE=""
24
25 # Github Auth Config
26 GITHUB_CLIENT_ID=""
27 GITHUB_CLIENT_SECRET=""
28 GITHUB_CALLBACK_URL=""
29 GITHUB_SCOPE=""
30
31 # Microsoft Auth Config
32 MICROSOFT_CLIENT_ID=""
33 MICROSOFT_CLIENT_SECRET=""
34 MICROSOFT_CALLBACK_URL=""
35 MICROSOFT_SCOPE=""
36 MICROSOFT_TENANT=""
37
38 # Mailer config
39 MAILER_SMTP_URL=__MY_SMTP_URL__
40 MAILER_ADDRESS_FROM=__MY_SMTP_USER__
41
42 # Rate Limit Config
43 RATE_LIMIT_TTL=60 # In seconds
44 RATE_LIMIT_MAX=100 # Max requests per IP
45
46
47 #-----------------------Frontend Config------------------------------#
48
49
50 # Base URLs
51 VITE_BASE_URL=https://__SELF_HOST_IP__
52 VITE_SHORTCODE_BASE_URL=https://__SELF_HOST_IP__
53 VITE_ADMIN_URL=https://__SELF_HOST_IP__/admin
54
55 # Backend URLs
56 VITE_BACKEND_GQL_URL=https://__SELF_HOST_IP__/backend/graphql
57 VITE_BACKEND_WS_URL=wss://__SELF_HOST_IP__/backend/graphql
58 VITE_BACKEND_API_URL=https://__SELF_HOST_IP__/backend/v1
59
60 # Terms Of Service And Privacy Policy Links (Optional)
61 VITE_APP_TOS_LINK=https://docs.hoppscotch.io/support/terms
62 VITE_APP_PRIVACY_POLICY_LINK=https://docs.hoppscotch.io/support/privacy
63
64 # Set to `true` for subpath based access
65 ENABLE_SUBPATH_BASED_ACCESS=true
2、nginx配置,default.conf
a.支持https,必须使用https,否则登录功能将不正常,这将导致无法使用团队空间,数据也无法落表
 1 map $http_upgrade $connection_upgrade {
 2     default upgrade;
 3     ''      close;
 4 }
 5
 6 server {
 7     listen 443 ssl;
 8     server_name __SELF_HOST_IP__;
 9
10     ssl_certificate /etc/nginx/ssl/certificate.crt;
11     ssl_certificate_key /etc/nginx/ssl/private.key;
12
13     location / {
14         proxy_set_header Upgrade $http_upgrade;
15         proxy_set_header Connection $connection_upgrade;
16
17         proxy_pass http://hoppscotch:80;
18         proxy_set_header Host $host;
19         proxy_set_header X-Real-IP $remote_addr;
20         proxy_set_header X-Forwarded-For $proxy_add_x_forwarded_for;
21         proxy_set_header X-Forwarded-Proto $scheme;
22
23         proxy_read_timeout 86400;
24     }
25     location /admin {
26         proxy_set_header Upgrade $http_upgrade;
27         proxy_set_header Connection $connection_upgrade;
28
29         proxy_pass http://hoppscotch:80/admin;
30         proxy_set_header Host $host;
31         proxy_set_header X-Real-IP $remote_addr;
32         proxy_set_header X-Forwarded-For $proxy_add_x_forwarded_for;
33         proxy_set_header X-Forwarded-Proto $scheme;
34
35         proxy_read_timeout 86400;
36     }
37     location /backend {
38         proxy_set_header Upgrade $http_upgrade;
39         proxy_set_header Connection $connection_upgrade;
40
41         proxy_pass http://hoppscotch:80/backend;
42         proxy_set_header Host $host;
43         proxy_set_header X-Real-IP $remote_addr;
44         proxy_set_header X-Forwarded-For $proxy_add_x_forwarded_for;
45         proxy_set_header X-Forwarded-Proto $scheme;
46
47         proxy_read_timeout 86400;
48     }
49     location /proxy {
50         proxy_pass http://hoppscotch-proxy:9159;
51         proxy_set_header Host $host;
52         proxy_set_header X-Real-IP $remote_addr;
53         proxy_set_header X-Forwarded-For $proxy_add_x_forwarded_for;
54         proxy_set_header X-Forwarded-Proto $scheme;
55     }
56 }
3、docker-compose.yaml
a.注意确认各service配置中,与本地路径有关的配置是否都与自己的一致,也可直接使用此配置,并根据下文提到的路径要求上传文件
 1 services:
 2   postgres:
 3     image: postgres:latest
 4     volumes:
 5       - ./data/postgres_data:/data/hoppscotch/postgresql/data
 6     environment:
 7       POSTGRES_DB: hoppscotch
 8       POSTGRES_USER: hoppscotch
 9       POSTGRES_PASSWORD: hoppscotch
10     networks:
11       - hoppscotch-network
12
13   hoppscotch-migrate:
14     image: hoppscotch/hoppscotch:latest
15     env_file:
16       - ./data/hoppscotch/hoppscotch.env
17     entrypoint: sh
18     depends_on:
19       - postgres
20     networks:
21       - hoppscotch-network
22     volumes:
23       - ./data/share_dir:/share_dir
24     restart: no
25     command: -c "pnpx prisma migrate deploy"
26
27   hoppscotch:
28     image: hoppscotch/hoppscotch:latest
29     ports:
30       - "8080:80"
31     env_file:
32       - ./data/hoppscotch/hoppscotch.env
33     depends_on:
34       hoppscotch-migrate:
35         condition: service_completed_successfully
36     networks:
37       - hoppscotch-network
38     restart: unless-stopped
39
40   nginx:
41     image: nginx:latest
42     ports:
43       - "443:443"
44     volumes:
45       - ./data/nginx/conf:/etc/nginx/conf.d
46       - ./data/nginx/ssl:/etc/nginx/ssl
47     depends_on:
48       - hoppscotch
49     networks:
50       - hoppscotch-network
51
52   hoppscotch-proxy:
53     image: hoppscotch/proxyscotch
54     ports:
55       - "9159:9159"
56     depends_on:
57       - hoppscotch
58     networks:
59       - hoppscotch-network
60
61 networks:
62   hoppscotch-network:
63     driver: bridge
64     name: hoppscotch-network
三、一键部署脚本
1、安装脚本 create_and_start.sh
a.注意本文提供的方式为使用本机ip,需要外部传入smtp相关信息
 1 #!/bin/bash
 2
 3 if [ $# != 3 ]
 4 then
 5     echo "$0 hostname(ip) smtp_url smtp_user"
 6     exit -1
 7 fi
 8
 9 self_host_ip=$1
10 smtp_url=$2
11 smtp_user=$3
12
13 mkdir -p data/nginx/conf data/nginx/ssl data/hoppscotch/conf
14 sed "s/__SELF_HOST_IP__/${self_host_ip}/g" conf/nginx/default.conf > data/nginx/conf/default.conf
15 ./gen_key.sh ${self_host_ip} "data/nginx/ssl"
16
17 sed "s/__SELF_HOST_IP__/${self_host_ip}/g" conf/hoppscotch/hoppscotch.env | sed "s#__MY_SMTP_URL__#${smtp_url}#g" | sed "s#__MY_SMTP_USER__#${smtp_user}#g" > data/hoppscotch/hoppscotch.env
18
19 sudo docker compose up -d
2、卸载脚本 delete.sh
1 #!/bin/bash
2
3 sudo docker compose down
4
5 if [ -d data ]
6 then
7     sudo rm data -r
8 fi
3、ssl证书生成脚本 ./gen_key.sh
 1 #!/bin/bash
 2
 3 if [ $# != 2 ]
 4 then
 5     echo "$0 self_host_ip target_dir"
 6     exit -1
 7 fi
 8
 9 self_host_ip=$1
10 target_dir=$2
11
12 openssl genrsa -out ${target_dir}/private.key 2048
13 openssl req -new -key ${target_dir}/private.key -out ${target_dir}/private.csr -subj "/CN=${self_host_ip}"
14 openssl x509 -req -days 365 -in ${target_dir}/private.csr -signkey ${target_dir}/private.key -out ${target_dir}/certificate.crt -extfile <(printf "subjectAltName=IP:${self_host_ip}")
四、整体目录结构
 1 root_folder
 2 |
 3 |-- conf
 4 |   |-- hoppscotch
 5 |   |   |
 6 |   |   \--hoppscotch.env
 7 |   |
 8 |   \-- nginx
 9 |       |
10 |       \--default.conf
11 |
12 |--gen_key.sh
13 |--docker-compose.yaml
14 |--create_and_start.sh
15 \--delete.sh
五、安装
1、调用 create_and_start.sh
2、修改页面配置

六、使用
1、api接口url: https://${IP}
2、管理界面url:https://${IP}/admin
七、数据查看
在机器中,可使用以下命令进入postgres数据库
docker exec -it docker_compose-postgres-1 psql -U hoppscotch

![[MDP.AspNetCore] 實作OAuth協定SSO Server/Client專案範例](https://img2024.cnblogs.com/blog/338864/202405/338864-20240503184110180-1175926493.png)


